Connect 4
Idea
One day I was playing Connect 4 with a friend on Discord (chat software similar to Skype). We were using the following Unicode characters as a board:
⚫⚫⚫⚫⚫⚫⚫
⚫⚫⚫⚫⚫⚫⚫
⚫⚫⚫⚫⚫⚫⚫
⚫⚫⚫⚫⚫⚫⚫
⚫⚫⚫⚫🟡⚫⚫
⚫⚫⚫🔴🔴🟡⚫
It was quite fun but very laborious. My friend then gave me the idea of creating a bot to automate the process. We also had the idea of adding a Chess-like ranking system with a scoreboard because the idea of making this simple game a competitive one made us laugh.
Fundamentals of a Discord bot
Discord works differently to Skype: There are private direct messages and discussion groups, however the majority of users prefer to join servers. A Discord server contains several voice and text channels. Discord servers usually have a large number of users, up to several thousand.
Servers also have the ability to invite bots. These are accounts that look like a classic user account, but are managed by a program through an API. Users interact with bots through commands: For example, someone can write /help and the bot would respond with a help message.
Realization
Overview
I developed th bot in TypeScript with the Node.js stack.
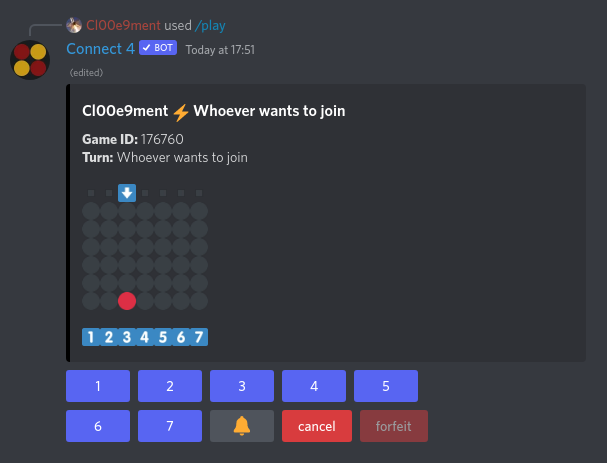
The bot works as follow:
- A user who wants to play types the command
/playand the bot responds with a message containing a game board. - To play in a column, the player just has to click on one of the buttons present under the message.
- The bot updates its message and the second player can play.
At the end of each game, participants gain or lose a certain amount of points. This amount of points is determined by an implementation of the Elo rating system which is used in Chess. The best players appear in the global leaderboard which can be shown when typing the /lead global command:

The bot has many other features / commands:
- One can list all the unfinished games.
- One can resume an old unfinished game.
- It is possible to forfeit.
- It is possible to claim victory when the opponent has stopped playing but has not forfeited.
- One can display a player's statistics.
- In order to be GDPR compliant, all of a user's data can be deleted and a user can hide their statistics.
- The bot can be configured by the manager of the server where it was invited: the language of the bot can be modified as well as its time zone.
- A monetary system has been implemented: by winning a game, players earn money which they can then use to modify the appearance of their discs.
Database
A database is needed to store all data related to games, players and Discord servers. I chose to use PostgreSQL, a SQL database, because the part of the code that handles the data is object oriented and it's easy to map a class to a table via an ORM.
Regarding the ORM, I chose to use TypeORM, because it integrates very well with TypeScript. It is also much easier to use and less heavy than the previous one I tested: Sequelize.
CI / CD
The bot is deployed on a Raspberry Pi 4. Given the number of services already running on the machine, everything is managed with containers to avoid conflicts and also just because it is much easier to manage in general.
Therefore, a Docker image must be built. The git registry that I use (GitLab) allows to set up a pipeline which is launched at each commit and which can be used to build the image. Luckily, GitLab can also host Docker images.
Unfortunately the Raspberry uses an ARM architecture and GitLab's servers run on x86-64. In order to build an image for a different architecture I was using Buildx which in turn used Qemu. However, in order to speed up the build, I now use a native ARM runner.
To summarize, each time I make a commit, a Docker image is built and I just have to download it on the Raspberry and launch it. It all looks very complicated, but in fact, everything is contained in the following small file:
variables:
  DOCKER_HOST: tcp://docker:2375/

.job_base:
  only:
  - master
  image: registry.gitlab.com/discord-connect-4/ci-build-env:latest
  services:
  - docker:dind
  before_script:
  - echo "$CI_REGISTRY_PASSWORD" | docker login -u "$CI_REGISTRY_USER" --password-stdin $CI_REGISTRY

.build_files:
  extends: .job_base
  script:
  - pnpm config set store-dir .pnpm-store
  # install prod and dev dependencies
  - pnpm install --frozen-lockfile
  # run the build script
  - pnpm build
  # keep only the prod dependencies
  - pnpm install --frozen-lockfile --prod
  # prepare the app dir for the Docker image build
  - mkdir app
  - mv build intl node_modules sql web COPYING app
  # build the Docker image
  - docker build -t "${CI_REGISTRY_IMAGE}:${CI_COMMIT_SHA}-${ARCH}" .
  - docker push "${CI_REGISTRY_IMAGE}:${CI_COMMIT_SHA}-${ARCH}"
  # cache the PNPM store for faster builds
  cache:
    key: pnpm-store
    paths:
    - .pnpm-store

build_for_amd64:
  extends: .build_files
  variables:
    ARCH: amd64

build_for_arm64:
  extends: .build_files
  variables:
    ARCH: arm64
  # execute this job on an ARM64 machine
  tags:
  - arm64

combine_docker_images:
  extends: .job_base
  needs:
  - build_for_amd64
  - build_for_arm64
  script:
  - >
    docker manifest create
    ${CI_REGISTRY_IMAGE}:${CI_COMMIT_SHA}
    --amend ${CI_REGISTRY_IMAGE}:${CI_COMMIT_SHA}-amd64
    --amend ${CI_REGISTRY_IMAGE}:${CI_COMMIT_SHA}-arm64
  - docker manifest push ${CI_REGISTRY_IMAGE}:${CI_COMMIT_SHA}
  # add the "latest" tag
  - docker pull ${CI_REGISTRY_IMAGE}:${CI_COMMIT_SHA}
  - docker tag ${CI_REGISTRY_IMAGE}:${CI_COMMIT_SHA} ${CI_REGISTRY_IMAGE}:latest
  - docker push ${CI_REGISTRY_IMAGE}:latest
An unexpected success
Against all expectations, the bot had a success far superior to what I had imagined. Apparently the competitive Connect 4 scene has a future...
I posted the bot on an unofficial site that lists Discord bots and servers (top.gg). From this moment on, I gained a lot of users. Currently, several tens of thousands of users have played the bot and it is present on more than 10 000 servers. Also, the community that has formed around this project has made the bot available in 15 different languages.
Conclusion
I really enjoyed this little project because it allowed me to play with a lot of different things:
- TypeScript / Node.js
- PostgreSQL / SQL
- the GitLab's CI / CD
- Docker
It's also a project that I finished in a reasonable amount of time: a few weeks. Finally, there is not only the satisfaction of a completed project, but also the satisfaction that I didn't do it just for me: other people seem to like the bot.